A Tradition Returns
With the revolution of 1917, Communist rule brought an end to open religious expression in Russia, and Christmas was largely replaced by the Festival of Winter. The Christmas tree, decorated with tangerines and dolls made of dried fruit, became the New Year’s tree. Grandfather Frost, a slender, blue-robed figure said to travel door-to-door in a troika (a sleigh drawn by three horses), brought gifts for all on New Year’s Eve.
Since the breakup of the Soviet Union in 1991, Russians have been free to celebrate Christmas as they wish. New Year’s remains a favorite gift-giving holiday, but millions of Russians are returning to the rituals and traditions of the Eastern Orthodox Church, which observes Christmas on January 7. The meatless meal that Orthodox Christians eat after a day of fasting on Christmas Eve — known as the Holy Supper — is rich in symbols that honor the Christmas story. A white tablecloth represents Christ’s swaddling clothes; hay is strewn across the table as a reminder of the manger; a tall white candle symbolizes Christ as “the light of the world.”
Traditionally, the meal consists of 12 foods, in honor of the 12 apostles. These include pagach (a potato-cabbage bread), which is dipped in honey and garlic to represent the sweetness and the bitterness of life, and the most important dish of the meal, kutya, a porridge made of wheat berries (for hope) and honey and poppy seeds (for happiness and success).
Recipe: Kutya
This sweet porridge, served for centuries on Christmas Eve, is eaten by all guests and family members from a single bowl to symbolize unity. In keeping with tradition, some families throw a spoonful of kutya up to the ceiling. If it sticks, a plentiful honey harvest is said to be in store.
Ingredients
- 1 cup whole wheat berries
- 4 cups milk, with extra as needed
- 1/2 teaspoon salt
- 1 cup honey
- 1 cup poppy seeds, ground in a coffee grinder or food processor
- Ground cinnamon
Directions
- Place the wheat berries in a medium bowl and add water to cover. Cover with plastic wrap and soak overnight. Drain.
- In a medium saucepan, heat the wheat berries, milk, and salt and simmer until berries are tender, about 2 hours. Check occasionally to make sure there’s ample liquid in the pan. Add more milk, if needed. Remove the berries from the heat, drain, and place in a large bowl.
- In a small saucepan over low heat, warm the honey; then stir in the ground poppy seeds. Remove from the heat.
- Preheat the oven to 325˚. Stir the honey poppy-seed mixture into the wheat berries, and add 1/2–3/4 cup boiling water. The mixture should be slightly soupy. Place the mixture in an ovenproof casserole and bake, uncovered, 20 minutes.
- Remove the casserole to a cooling rack, and let stand 15 minutes. Sprinkle lightly with cinnamon. Serve warm or chilled.
Variation: Stir 1/4 cup chopped dried apricots, raisins, or toasted slivered almonds — or all of them — into the wheat-berry mixture just before baking. Serves 6.
Recipe from CHRISTMAS IN RUSSIA — Christmas Around the World, from World Book. (c) 2001 World Book, Inc. Reprinted by permission of the publisher.
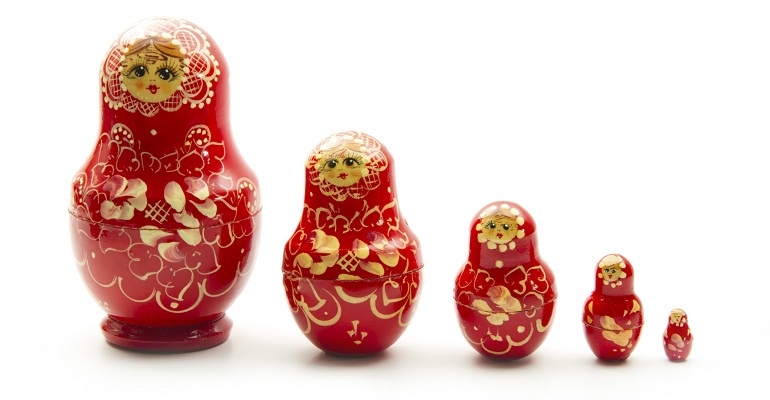
Matrioshka Doll Tree Ornament
This hanging ornament is inspired by the familiar Russian matrioshka dolls — a set of increasingly smaller wooden dolls, each one fitting inside another.
Materials:
- Compass
- Colored paper
- Pencil
- Colored yarn
- Glitter
- Colored sequins
- Crayons
- Markers
- Poster paints
- Transparent tape
- Scissors
- Yarn needle
Optional:
- A jingle bell
- Photos of family members
- With a compass, draw a circle for each member of your family on paper of different colors. The smallest circle should be 6 inches in diameter; the next, 7 ½ inches, and so on, in 1 ½-inch increments. Fold each circle and cut into even half-circles. Use a half-circle of each color to represent a family member.
- Holding each half-circle straight edge up, draw a smaller circle in the center for a face. Glue on yarn for hair, or draw on hair and features using crayons or markers. For a touch of realism, glue on faces from family photos. Next, draw arms and an upper body or cut them out from colored paper. Draw on clothing and decorate the background, using paints, markers, glitter, sequins, etc. (Don’t decorate the straight-edge area, which will overlap when you make a cone.)
- To make cones, place glue along one-half of the straight edge. Overlap the straight ends of the half-circle, and press tightly together. Repeat with each doll. Then bend the tip of each cone over to the undecorated side of the cone. Secure the tip with tape.
- Thread the yarn needle with a 30-inch piece of colored yarn. Tie a double knot 4 inches from the end. Placing the needle inside the smallest doll, pierce the bent-over tip of the cone. Draw the thread through the cone until you reach the knot. Tie another knot in the yarn, 4 ½ inches from the top of the first doll. Pierce the tip of the next-smallest doll and draw the yarn through until you reach the double knot. Repeat this step until you have connected all the dolls.
After connecting the dolls, loop the top end of the yarn and knot it close to the tip of the top doll. If you wish, tie a jingle bell to the yarn at the bottom of the smallest cone.